Draw a Box Around a Form Element
Integrating Technology in the Second Language Classroom
��Jean LeLoup & Bob Ponterio
SUNY Cortland
© 2017
- Spider web pages are frequently fabricated to give information to the student (presentational mode), only to actively appoint students, information technology can be useful to get information back from the student (interactive mode). An element or object needs to be inserted into the spider web page that allows the student to give input. Three steps are needed to get in possible for someone to type information into a web page:
- A Form sets upward an area on the folio in which interactive elements (Grade Objects or Form Fields) may be placed. The Form is not really visible on your final spider web page.
- Grade fields such the text box , textarea , drib-downward menu , and radio button , create places inside the Course on the page where the information may be entered.
- One time the information has been entered, the student should be able to exercise something with information technology. Information in course fields could be mailed to the teacher, candy with a cgi-script computer program, processed with a JavaScript reckoner program, manipulated by an ASP folio, printed, or even visually checked by the student against a suggested answer provided past the instructor.
In this lesson we will add interactivity on a web page by setting up a form, making some form fields, and mailing student input to the teacher (or simply printing the page with the educatee input).
Setting up a Form : <form> </class>
Inserting Form FieldsInteractive fields must be located inside a Course . A spider web folio form is piece of cake to gear up, still forms can be confusing to beginners because they are NOT visible in your web browser. This is where we demand to become "the man backside the curtain." This tin exist washed by inserting the class tags while editing a page in KompoZer. Everything between the open form tag <form> and the close grade tag </form> is part of the course, and whatsoever information entry fields (grade fields) must be located inside of a form in society to work.
The <form> tag tin can include additional parameters that decide what the course will practice with anything that the student types, only these are not needed for our purposes. In the post-obit example, nosotros come across a form that will email something to the teacher, but your form doesn't demand to exist ready to exercise this in particular, Information technology is enough to have just the open up and close form elements.
To create the Form in KompoZer, use the Insert / Form / Define Form bill of fare particular and insert the post-obit into the window:
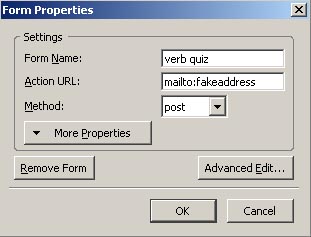
Course Name="verb quiz"
activity="mailto:fakeaddress"
method="post"If you look at the HTML Code for the form, yous will see something like :
<form method="mail" action="mailto:fakeaddress" proper name="verb quiz"><br>
</course>or but
<class>
</form>However, all nosotros really need for our purposes are the two simple form tags. The form elements need to be inserted within the form expanse, in other words between the open form tag <class> and the shut class tag </form>.
You tin add the <form> and </form> tags to a page by editing the Source Code and typing them in where you lot wish. This is sometimes easier than inserting the tags using KompoZer buttons.
It can be useful to use the split view for both Pattern and Source in order to better see where things are. In Blueprint view, you will come across a bluish dotted line around the form area. You can fifty-fifty put all of the content of your folio into this class area past placing the course tag after the <body> tag and the close class tag before the shut trunk tag </body>.
In KompoZer, utilize Insert/Form/Class field... to place the elements inside the form surface area. Such form objects have individual names that will later let the states to manipulate them in various ways using software.
For the moment, simply getting the form elements (most importantly the textbox) on your page within a course area is enough. Practise, and when you feel comfortable doing this, and then get on to the next pace.
The nearly common mistakes students make are forgetting the <course> tags or giving multiple form elements the same proper noun.
Processing Student Input
There are many ways to process information from the text boxes, textareas, menus, radio buttons, and other form fields. Most of these involve computer programming that is across the telescopic of this lesson. Data can be sent to and processed past:The cgi script and asp page run on a remote calculator and receive form information from the educatee through the Net. In addition to sending feedback to the educatee, they are capable of storing student responses in a database for subsequent examination by the teacher. These techniques are non very complicated for someone with basic computer programming skills but do require such skills every bit well equally access to sure server privileges. Most teachers will non want to tackle these.
- a cgi script - a computer program running on a server.
- an asp web page - an active server web folio with programming congenital-in.
- a JavaScript program - a reckoner program built-into the same web page with the original form.
JavaScript is a very simple scripting linguistic communication designed for writing pocket-sized programs within a web page. It can procedure data located in form objects without accessing a remote computer. Although JavaScript is very uncomplicated equally programming languages become, information technology is not picayune for a non-programmer. But if you have a flake of Javascript lawmaking written past someone else, using it is not too hard.
Non-programmers might get assistance from a programmer to create a basic full general purpose routine to practice something with pupil input and then reuse this same program on multiple web pages. Ane may also discover sample utilities online that tin be used equally is or slightly modified and integrated into your pages. Information technology is possible to find utilities that will let the answers to be stored.
Even without a JavaScript utility, the pupil might simply blazon in their responses and then press the Print button on the browser window to print out the answers and mitt them in to the teacher.
Using pop-up windows to provide feedback
Providing an online reply central or placing answers in pop-up windows may be more manageable in many cases. This method allows the student to check his or her ain answers confronting the teacher's model. Run into our lesson on glossing or annotating tests for the technical details. The following new form shows examples of how the pop-up window technique might work for the same prepare of questions shown in a higher place:
These pop-up windows utilise JavaScript, merely there are other techniques that can also work. For instance, you could identify answers on a separate spider web folio answer sheet that opens in a new window. Answers
Summary
Form fields assist brand your spider web pages more than interesting by engaging the students actively. Many techniques can be used:
- A computer program manipulating or capturing the student answers
- A mailto submission sending student responses to the teacher
- A JavaScript utility providing format for printing
- Pop-up windows or total web folio respond keys helping students check their work
- Hiding the answer on the folio and revealing it when approriate
- Printing the web page itself with the answers to exist handed in
Past having the student do something with the linguistic communication and actually dispense data on the screen, the folio becomes interactive and helps limit the potential passivity of whatsoever medium that sends information merely in ane management.
Some of these sites are appropriate for relative beginners, just others may be considerably more complex.
HTML Forms Tutorial: http://javascript-coder.com/html-class/html-course-tutorial-p1.phtml
Editing KompoZer Forms: http://anh.cs.luc.edu/python/hands-on/examples/www/commonFormFields.html
How to Add together a Feedback Form to Your Website Using KompoZer: http://world wide web.thesitewizard.com/gettingstarted/kompozer-tutorial-v.shtml
HTML Goodies - HTML Forms : http://world wide web.htmlgoodies.com/tutorials/forms
Dreamweaver- How to create a web form : https://helpx.adobe.com/dreamweaver/how-to/create-web-form.html
JavaScript for the Total Non-Programmer : http://world wide web.webteacher.com/javascript/
Thau'due south JavaScript Tutorial : http://www.webmonkey.com/2010/02/javascript_tutorial/
Using JavaScript and forms : https://www.javaworld.com/commodity/2077176/scripting-jvm-languages/using-javascript-and-forms.html
Return to Syllabus
Source: https://web.cortland.edu/flteach/mm-course/forms-textbox.html